Finding Low Income Lifeline Cell Plans in Your State (How to)
What is the Lifeline Program?
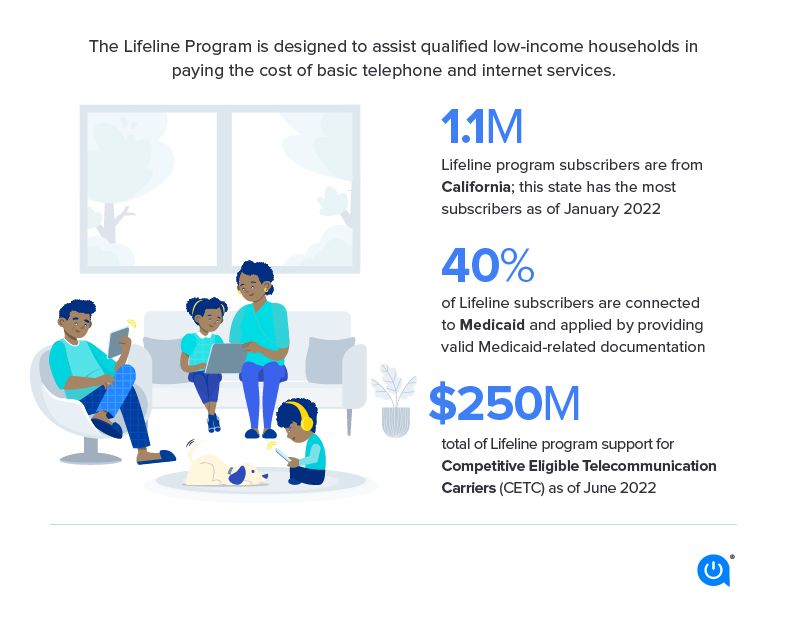
The Lifeline program is a U.S. Federal Communications Commission (FCC) program that provides discounted phone and internet services to qualifying low-income consumers. The goal of the program is to help ensure that all Americans have access to affordable communications services. Lifeline is part of the Universal Service Fund and was established in 1985 [1].
The Lifeline program allows eligible low-income subscribers to receive a monthly discount on either landline phone service, wireless phone service, broadband internet service, or bundled voice-broadband packages. Subscribers can receive a discount of up to $9.25 per month on their service. The Lifeline discount can be applied to either a wireline or wireless service plan, but subscribers may only receive one Lifeline benefit per household [2].
To qualify for Lifeline, subscribers must either have an income that is at or below 135% of the federal Poverty Guidelines, participate in certain assistance programs like SNAP or Medicaid, live on Tribal lands, or meet other eligibility criteria. The program is available in every U.S. state, territory, commonwealth, and on Tribal lands.
Check If You Qualify for Lifeline
The Lifeline program provides discounted phone and internet services to low-income consumers. There are two main ways to qualify for Lifeline – based on your income or through enrollment in certain government assistance programs.
To qualify based on income, your household income must be at or below 135% of the Federal Poverty Guidelines. For example, in 2023 the income limit for a family of four is $36,620. You can find the full chart of income limits on the Lifeline Support website.
You may also qualify for Lifeline if you already participate in certain government assistance programs like Medicaid, Supplemental Nutrition Assistance Program (SNAP), Supplemental Security Income (SSI), Federal Public Housing Assistance, Veterans Pension or Survivors Benefit Programs, or certain Tribal-specific programs. Check the full list of qualifying programs to see if you are already enrolled.
In general, you must meet income requirements OR be enrolled in a qualifying program. Only one Lifeline benefit is allowed per household, not per person. Check with your state or local Lifeline provider to confirm eligibility requirements in your area.
Find Lifeline Providers in Your State
The easiest way to find Lifeline providers in your area is to use the National Verifier tool. The National Verifier is the centralized system that determines eligibility for the Lifeline program. It is managed by the Universal Service Administrative Company (USAC) on behalf of the FCC.
To use the National Verifier to find Lifeline providers:
- Go to the National Verifier website at https://www.usac.org/lifeline/national-verifier/.
- Enter your home address zip code.
- Select your state from the dropdown menu.
- Click “Continue”.
- The website will show you a list of Lifeline providers available in your area that you can select from.
The National Verifier provides a simple way to identify Lifeline providers in your locality. Make sure to explore all available options to find the best Lifeline plan for your needs.
Compare Available Plans
When comparing Lifeline plans offered by different providers, you’ll want to look at a few key factors like the included talk, text, and data allowances.
Most Lifeline plans include unlimited talk and text, so the main differentiator is the data allowance. Data allowances can range from as little as 1GB per month up to unlimited data depending on the provider and plan.
For example, SafeLink Wireless offers plans with 1GB, 3GB, or unlimited data. Assurance Wireless offers a plan with unlimited talk, text, and 3GB of data. And Q Link Wireless has plans with 1.5GB, 3GB or 6GB of data.
Some providers offer extra features beyond just talk, text, and data. For instance, Q Link includes a free Android smartphone with their plans, while SafeLink offers unlimited international calling to select countries.
Understanding the differences in data allowances and any other perks can help you determine which Lifeline carrier and plan fits your usage needs the best.
Understand Limitations
There are some key limitations to be aware of with the Lifeline program:
Only one Lifeline discount is allowed per household. According to the FCC, a household is defined as “any individual or group of individuals who live together at the same address and share income and expenses.” So only one person in a household can receive Lifeline benefits at a time.
Lifeline subscribers are required to recertify their eligibility every year. You will need to verify that you still qualify for the program based on income or program enrollment. Your provider will contact you when it’s time to recertify. Failure to recertify will result in your Lifeline benefits being discontinued.
There are usage limits. Most Lifeline plans include a set number of monthly minutes, texts, and data. Going over those limits will result in additional fees. Understand the usage allotments of any plan you are considering.
Plans are non-transferrable. Your Lifeline benefit stays with you, even if you change providers. But you can’t transfer it to another person.
Services may be limited. Not all Lifeline providers offer both phone and broadband services. The services available to you will depend on your state and provider.
Always follow the program rules to avoid penalties or being de-enrolled. Make sure to recertify on time, use your own benefits, and don’t attempt to abuse the system.
Apply for Lifeline
To apply for the Lifeline program, you’ll need to contact a Lifeline provider that offers service in your state. Many providers allow you to apply online or by phone. When applying, you’ll need to provide proof that you qualify based on income or government program enrollment.
To apply online or by phone, you’ll need to provide your full name, date of birth, last 4 digits of your social security number, and address. You’ll also need to upload or mail proof of eligibility such as a copy of your SNAP/Food Stamps card, Medicaid card, Supplemental Security Income benefit letter, or prior year’s state or federal tax return. Some providers may allow you to provide verbal attestation of your eligibility if you qualify through income requirements.
Here are some examples of Lifeline providers you can contact to apply:
– Assurance Wireless: https://www.assurancewireless.com/lifeline-services
– Q Link Wireless: https://qlinkwireless.com/enroll/
– SafeLink Wireless: https://www.safelinkwireless.com/Enrollment/Safelink/en/Web/www/default/index.html#!/newHome
Once approved, you’ll receive instructions on how to activate your Lifeline phone and service. You must personally enroll and cannot transfer your Lifeline benefit to another person.
Activate Your Phone
Once you receive your new Lifeline phone, you’ll need to activate it to start using your plan. The activation process varies depending on your specific Lifeline provider.
Typically, you’ll need to call or go online to activate. Your provider should include activation instructions in the phone packaging or sent to you. For example, some providers may require you to call a dedicated activation number to activate over the phone.
Make sure to have any required account information on hand when activating, such as your account number, phone number, and billing details. You’ll likely need to provide personal details like your name, birthdate, and the last 4 digits of your social security number.
Follow all the prompts and instructions carefully when activating. Some providers may require you to set up voicemail or create an online account login. The entire activation process usually only takes about 5-10 minutes.
If you run into any trouble activating, don’t hesitate to contact your provider’s customer support for assistance getting your new Lifeline phone up and running.
Manage Your Lifeline Plan
Once you are enrolled in the Lifeline program, it is important to properly manage your Lifeline plan to avoid service interruption. Here are some tips:
Maintain usage within allowances – Lifeline plans include monthly allowances for minutes, texts, and data. Be sure to track your usage to avoid overage charges. Most providers will cut off service if you exceed your allowance multiple times.
Recertify eligibility annually – Lifeline recipients must demonstrate eligibility each year. Your provider will send you a recertification form that you must complete and return with proof of participation in a qualifying program like Medicaid or SNAP. Failure to recertify on time will result in service suspension and eventual de-enrollment from Lifeline.
Report changes promptly – Inform your Lifeline provider immediately if you have an address or name change to avoid any eligibility issues. You must also report if you no longer qualify for Lifeline due to increased income.
Check account details online – Most Lifeline providers give you access to an online account portal or app to monitor your usage, change plans, pay bills, and manage your Lifeline benefit.
Contact customer service – If you have any account issues, reach out to your provider’s Lifeline customer support team for assistance. They can help troubleshoot problems and ensure your Lifeline service continues uninterrupted.
Deactivate or Transfer Service
If you no longer qualify for Lifeline or simply wish to deactivate your Lifeline service, you must contact your service provider directly. Most providers have a phone number or online form to submit your request for deactivation.
It’s important to properly deactivate rather than simply abandoning service, as you may continue to be charged otherwise. Once deactivated, you will no longer receive the Lifeline benefit.
If you wish to transfer your Lifeline benefit to a different provider, you must first have the new provider submit a transfer of service request. This allows them to claim your Lifeline benefit. Once approved, it will deactivate the Lifeline discount with your previous provider as part of the transfer process. For details, contact the new provider you wish to switch to directly. The transfer process may take several days to complete.
According to the Lifeline Support website, if your service gets deactivated due to program non-compliance, you have 60 days to complete the recertification process to avoid having the deactivation be permanent. This involves demonstrating you still qualify for Lifeline. Check with your provider on the specific requirements if this situation applies to you.
10. Get Help from Your Provider
If you have any issues with your Lifeline service, it’s important to know how to get help from your provider. Each Lifeline provider has customer support available to assist Lifeline subscribers.
Most providers have the following ways to contact customer support:
- By phone – Call the customer support line during business hours. Many providers have toll-free numbers for Lifeline subscribers. Wait times may vary.
- Online chat – Many providers offer live chat with agents through their website. This can sometimes be faster than calling.
- Email – Send an email to the provider’s customer support team. You’ll likely get a response within 24 hours.
- Self-service account management – Log into your online account to check usage, change plans, make payments and more. This allows you to help yourself without contacting an agent.
Before reaching out, have your account number and any other relevant info handy. Explain the issue clearly and the provider can troubleshoot solutions.
Most issues like activation, billing, lost/stolen phones, or service questions can be handled through customer support. They can also assist with cancelling or transferring your Lifeline service if needed.
If you’re unable to resolve an issue directly with your provider, you can also file a complaint with the FCC by calling 1-888-225-5322 or visiting https://consumercomplaints.fcc.gov.